How to Sharpen a Shovel in Minutes
When it comes to digging holes, a shovel is the first thing that comes to most people’s minds. A shovel can be found everywhere from construction sites to homesteads. A shovel is an integral part of a homestead or prepping scenario, from digging holes for fence posts to planting a new orchard of fruit trees the uses are almost endless.
However, if you have ever dug a hole using a shovel then you know how tedious this can be with a dull shovel. Dirt and the included roots and rocks by their very nature attack your shovel and grind its finely sharpened edge down to a dull blunt chunk of metal.
This is why you should take a moment every now and then to sharpen a shovel when you plan to use it. While it may not make the task anymore enjoyable it should definitely make it easier.
Sharpening a shovel can be done by grinding the edge down to a 45 degree angle. This is best done with a power grinder or a file and should be only ground on the interior curved side of the blade. A few quick passes will make a world of differences.
Sharpen a Shovel in 6 Easy Steps
1) Use a wire brush or water and clean off any dirt on the shovel.
This step is important as the caked on dirt or mud can clog up the teeth on your file and will both dull the file and prevent it from removing the metal on each pass and prevent the shovel from obtaining that finely sharpened edge you are seeking.
2) Hold the shovel firmly in place.
You are going to be removing some of the metal on the shovel blade in order to sharpen it, therefore you need a way to securely hold the shovel head in place. If you are going to use a grinder then a clamp or vise is the preferred method.
However, I normally sharpen my shovels and other small items with a hand file. In the case of a shovel I find it easiest to take a seat on something such as a five gallon bucket and place the head of the shovel curved side up on my knee with the handle protruding under my arm and out behind me.
This allows me to hold the shovel in place by applying downward force from my arm on the handle and it resting on my knee prevents it from rotating.
3) Examine your file or grinder for any defects and examine the shovel blade at this time for any large nicks.
When examining your grinder disk, check for cracks in the disc, missing pieces and that it is properly secured tightly in the grinder with the guard in place.
For a file you should check that the handle is securely fastened to the file if using one, that the file teeth are clean and not filled in with shavings and that there are no chips along the file.
FInally examine the shovel blade and determine if a simple sharpening is going to be sufficient or if there is severe damage to the blade which will require more work. If there are any pieces of the blade peeled back you can fold them back in place using a pair of pliers, however, for structural integrity of the blade you are going to want to file or grind down past that when sharpening so that you have a single continuous piece of metal for the blade.
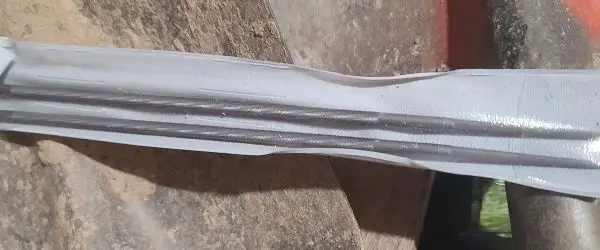
4) Angle your tool consistent with the existing angle on the shovel. Normally 45 degrees.
A shovel is a single edged (bevel) tool. This means that only one side of the blade is sharpened. An axe is an example of a double bevel tool since both sides are sharpened forming a wedge.
In the case of a shovel it is almost always preferred to sharpen the inside curved edge of the blade. This allows the outside edge to remain straight and aids in digging a hole with straight sides if that is desired.
5) Using the grinder or file push from the handle side of the blade towards the open air.
This direction is more important when using a file or sharpening stone than with a grinder. First it creates the sharp edge and any burrs on the point where ground contact will occur first.
Secondly it provides a level of safety should your file suddenly slip and come off the shovel. This would allow your hand to just slide past the blade, if sharpening from the blade towards the handle you run the risk of being cut should your file slip.
Make sure to run the sharpener the full length at a slight angle and sliding around the edge of the shovel. This will allow for a more even edge along the entire blade. It will also help to avoid gouging any particular area or heating the blade unnecessarily.
Once you have achieved a good edge you should have a width of blade that is bright and shiny about the thickness of a quarter or a little more.
6) How dull the shovel is will determine how much grinding is needed.
Continue with long even strokes until you have removed any damage in the blade and have the shiny beveled edge in place. At this time you will likely have developed a burr on the back side of the shovel. This is expected and can help to confirm you have sharpened the length of the blade.
Take your file and make two or three quick light passes over the back side to remove this burr. Flip the shovel over and go over the edge one or two more times to finish up the edge.
Storing your Newly Sharpened Shovel
A few simple steps can help to keep the edge on your shovel when it is stored.
- Store the shovel in a dry area.
- Avoid storing the shovel so that the blade rests on hard surfaces such as concrete
- Remove any dirt on the shovel with a wire brush or water before storing.
- Remember the edge is sharp, many people prefer to hang shovels high on the wall to remove this danger.
- If being stored for an extended time, coat the blade with wd40 or similar anti rust coating.