
11 Tips for Hiking in the Snow
Hiking in the snow is something many people never consider. Many hikers feel that you can only enjoy the great outdoors during the mild weather. However, hiking in the winter can bring not only all new challenges but new experiences as well. You should not let the snow and ice of the winter months discourage you from enjoying the great outdoors.
Hiking in the winter and more specifically in the snow requires more preparation and the consideration of additional gear you would not otherwise need when hiking.
The first consideration of winter hiking is obviously the temperature. It is important to dress warmer, but due to temperature changes as you progress through hills, valleys and even on flat terrain it is important that these warmer clothes be in layers. Layers are critical because they allow you to take off portions or add on portions as needed.
The next consideration is the landscape you’re walking on. During winter hiking you may cross dry ground, wet terrain and snow or ice. Each of these may affect your progress and should be encountered.
In this particular section we are going to discuss hiking in the snow or ice.
The Basic Footwear choices for Hiking in the Snow
Hiking in ice, powdered snow and packed snow all pose different challenges. While they will all require similar clothing the foot wear may vary.
Oftentimes powdered snow is encountered. When hiking in powder snow you may need to consider the use of snow shoes depending on the depth of the snow. Snow shoes are large tennis racket looking devices that increase your foot print and help to prevent you from sinking into the snow.
Packed snow is often uneven but compressed. This generally leads to you being able to walk on it without too much slipping and without sinking into it. This is commonly encountered on popular trails and roadways etc. However, there are times when packed snow melts slightly and then becomes ice once it refreezes.
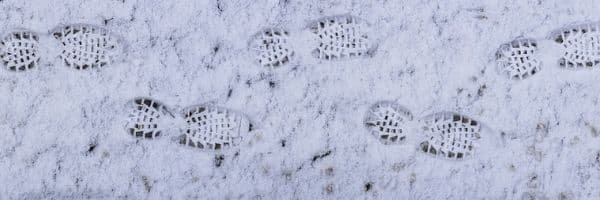
Ice can be the most dangerous material to hike on, however there are some things that you can do to increase your safety and footing on ice. Crampons are small metal spikes that can be worn over your boots. These bite into the ice and allow you to maintain your traction.
A common tactic for those avid winter hikers is to pick a decent set of waterproof boots and then keep a set of crampons or microspikes in their backpacks in case they encounter ice. Hiking rods or trekking poles are an ideal inclusion for winter hiking as well.
11 Tips to Increase Your Enjoyment and Success
1. Dress Appropriately
Layered clothing is the most important step you can take when considering the clothing you will wear hiking in the winter. These choices can ensure your success or failure to keep the following things in mind.
Lower Body/Leg Coverings
For your legs consider base layer thermals and a decent set of pants. If the temperatures are lower than 30 degrees and you are encountering snow then you will likely want to include an additional outer set of waterproof pants. When it gets to sub-zero temperatures then you may want to consider an additional layer such as the overalls commonly seen when skiing. These are also known as Salopettes.
Upper Body and Chest
When choosing an upper level you again want to choose layered clothing. A silk or polyester undershirt with a fleece mid layer provides an excellent start. An external breathable shell that is waterproof should also be carried with you, if not worn then stashed in your pack in case it is needed. When you expect to encounter subzero temperatures then you can consider an additional lightweight layer between the fleece and outer jacket. This is where a gilet can come into play. Choose one that is lightweight enough to be removed and easily packed away.
Exposed Skin Face, Hands
The last consideration is obviously your exposed skin areas. When reaching temperatures that are below freezing and more especially in sub-zero temperatures frostbite becomes a real concern. Most commonly the first areas affected are those that protrude away from the main body. These include your fingers, toes and portions of the face such as nose and ears.
For footwear I recommend two pairs of socks at a minimum. Thinsulate socks and a heavier winter sock. These will provide not only protection from the cold, but allow the two materials to rub together and lower your chance of blisters forming as well. Couple this with a pair of well fit insulated waterproof boots and you are good to go.
For gloves I recommend a similar set up. A pair of lightweight thinsulate gloves coupled with a waterproof outer pair such as ski gloves.
You also want to make sure that you include a well insulated cap and something that you can cover the face with. A neck gaiter or balaclava will work in this area though I prefer the balaclava myself.
In each of these considerations, make every attempt to avoid materials made from cotton. This material will absorb water and increase the effects of the cold. Try to select a material that is breathable and designed to move moisture away from the body.
2. Plan Your Trip Times in Advance
Winter and snow hiking requires careful consideration of temperatures. It is obvious that temperatures in the sunlight are going to be higher than those once the sun goes down. With realistic expectations consider the distance that you can cover in a single day.
Keep in mind that ice and snow will likely slow you down from your normal pace. Where you can probably cover 3.5 to 4.5 miles per hour on a normal day you will likely be slowed to a pace of around 2 miles per hour in the snow.
Keep this in mind and plan to start your trip early enough in the morning to allow you to finish well before the sun goes down.
When you first begin hiking in the snow, it is better to start small. The physical exertion required to trek through the snow tends to be somewhat higher than that normally encountered on a hike. This is due to the extra energy required to keep your body warm, maintain your footing and push your way through the snowy terrain.
3. Communicate Your Plans
While it is always important that someone knows where you are going and when you expect to return this becomes paramount when hiking in the snow. In the winter, conditions can change at a moment’s notice and it is far more risky to be trapped out in the elements than it is in the summer or fall. Extreme cold and ice can dramatically increase the dangers of not making it through the night.
Keep your cell phone on you and remember that the cold can make it discharge slightly faster. Note the numbers for the local authorities tasked with rescues in that area and remember that it is possible you may not have cell coverage so have a back up plan.
4. Do Not Go out Alone
While you should rarely head out into the wild alone, sometimes that is the whole point. In winter though this is not often advisable, especially for novices. The dangers of freezing to death before rescue can find you are far greater than the chance of starvation or dehydration in more fair weather.
If traversing a new area then having a guide along may be ideal. Often the trails that are clearly marked during the summer months will have their markings obscured by snow. This can increase the dangers of wandering off the trail and becoming lost.
However, even considering that everything goes perfectly, having someone along for the journey will increase the memories and give you something to talk about for years to come. Additionally, if hiking in a group then you can split up some of the safety items you should be carrying and lighten everyones load.
5. Check the Weather Before Your Trip
As you near the date of your trip make sure that you are checking the weather. Consider what the temperatures and moisture levels have been for the past few days, and the forecast for the next 2 to 7 days. If you have consulted this information it will let you know what to expect and allow you to prepare for the weather you may encounter.
Make sure to consider wind speed as well. Highwinds could lead to whiteouts and blizzard like conditions. If traveling above the treelines these higher winds could make it all but impossible to see and pose a significant safety concern.
If the weather conditions appear to be too hazardous it is better to reschedule your trip for a day that the weather is more favorable than to risk it.
6. Come Prepared for Almost Any Situation
I am sure you have heard stories of the hikers who went out in the snow and then for what ever reason became stranded or injured, which in turn forced them to spend a night or even several nights out in the elements.
Keep this in mind and prep for nearly anything you think could happen. Keep in mind you will be carrying this gear so consider items that are lightweight and necessary for survival.
Some suggested items are a bivouac sack, heat source, light, emergency shelter, extra food and water as well as a first aid kit. In addition you will need some way to prepare the food. In these situations I tend to carry military style prepackaged meals or something such as the freeze dried foods I can just add water to. These options allow me to focus more time and energy on shelter than preparing food.
A decent sized three-day pack should allow you to carry sufficient supplies without being overly large. Choose one that has external pockets so you can easily store items that you need to access quickly. You can store the items that are more of a just in case deeper in the pack.
Keep in mind though simply putting the items in your vehicle doesn’t work. You need them in your pack with you in the field to be useful.
14 Items for a Winter Survival Kit In Your Car
7. Additional Equipment You Should Consider
There are several pieces of equipment that become even more important for winter snow hiking than they are in the summer. Two of these specifically are walking or “trekking” poles and sunglasses.
Sunglasses
Yes, you read that right, sunglasses. You want to make sure and take sunglasses with UV400 protection or goggles for hiking in the snow. The reason is the extreme glare on the snow can irritate your eyes. Additionally if heavy winds kick up and begin blowing the ice or snow around then you will not be able to keep your eyes open and you could lose the trail or worse fall into a ravine and get injured.
Trekking poles
Trekking poles are critical in winter hiking as well. Not only do they provide extra stabilization but you can also use them to probe the snow ahead of you in questionable areas. Careful probing can help to ensure you do not fall into any hidden holes. These could be covered by the light snow. They can also be used to some extent to test frozen waters. Though if at all possible avoid frozen water unless there is no alternative.
Rope
Rope is another item you may not have considered for a simple hike. Consider your terrain and decide if a 50 foot length is sufficient or if you want to carry a slightly heavier 100 ft. length. In either instance try to select a rope designed for climbing, these will have shear strength to support falls etc.
Ice Axe
Lastly is an Ice Axe. These can be an extremely useful addition to your winter hiking gear. Used for support while climbing slopes and as an arrest should you fall. You can also use it to cut steps into hard packed snow or assist with digging a depression into the snow should you be forced to weather the night.
Gear is not an area you should try and skimp on costs, buy decent high quality gear. If you need to save some money then make most of your purchases at the end of the season when stuff is being put on clearance. This will allow you to still get good gear but at lower prices.
8. Your Feet Are Your Most Valuable Asset
Keep in mind that you are going for a hike, which obviously means extensive walking. Your lightweight summer boots probably will not provide enough protection. For winter hiking you are going to want a sturdier sole and water proof exterior. These tougher exterior will allow the use of snowshoes or crampons if they become necessary. Consider testing these items together at the store to ensure they are compatible and fit properly when installed.
Socks are another area you do not want to skimp on. Some people think sock liners are a waste, however I beg to differ. Not only do silk liners provide some extra warmth, they can also transfer any friction from your foot to the area between the liner and sock. This greatly reduces the chance that your feet blister. Next is a good pair of wool socks that are thickly padded.
With the choice of socks in mind, you should try on your hiking boots while wearing your hiking socks. You want a boot that can be laced properly, but still have enough room for your toes to move around inside. Often when hiking your feet will swell slightly and you want to make sure there is room for that.
9. Orientation Skills will Be Affected
If you are normally able to read a map and quickly orientate based on topography, you should know this is likely to be far more difficult in winter conditions. You may not be able to see frozen rivers that are covered with snow and ice. Without extreme care you could fall into these. Trail markers may also be covered by snow making following a designated route that much harder.
If possible carry a GPS in addition to a map and compass. Before heading out make sure that you have selected an emergency route. You should also advise someone of your planned route, plus the route you are going to take should something go wrong.
What is the Best Compass – 6 Great Options
Frequently this can be a larger obvious landmark such as a specific mountain range, firetower or other object such as a lake that can be seen from a long distance. If you become lost and unable to reorientate, head to the highest point you can and look for your landmark. It may be enough to orientate you. If not then head straight for that landmark. Since you have planned it in advance and told someone they will know that is where you would head if something happens.
Should you find that you’re going to be caught out in the weather, seek an area below the tree line and off of any ridges. This will provide you with some shelter from the wind and increase your chances of successfully building a fire.
10. Crampons vs. Snowshoes and When to Use Each
Crampons and snowshoes can both prove invaluable in snowy or icy conditions. You should carry both if you have the ability to. Keep in mind it is important to know when you should or should not use either one.
Snowshoes are ideal when encountering fresh unpacked snow. They spread your weight over a larger surface area and help to prevent you from sinking into the snow. However, they should only be used on level terrain as they provide minimal grip. Because of this they should not be used when ascending or descending hills.
Crampons are almost the opposite of snowshoes. Where snowshoes prevent you from sinking into the snow, crampons are intended to bite into the ice. This provides better traction. Their jagged teeth make them ideal for climbing or traversing extremely icy areas. However, just like snowshoes they have a downside. They should not be used in fresh or loose snow as the likelihood of slipping is increased. This is due to their spiked design preventing them from biting into this material.
With either of these two it is important that you have tested their fit and practiced putting them on and removing them prior to actually needing them.
11. Monitor Your Progress and Be Prepared to Cut the Trip Short
While it is obvious that you want to complete your planned trip every time you go out, you need to be realistic. If you are attempting to summit a specific peak or reach another goal keep in mind in many cases you still have to make the return trip.
Should you encounter fatigue you were not expecting or conditions that are too hazardous to continue you should turn back. It is far better to turn back and return home safe. You can always attempt the trek at a later date. You certainly do not want to continue and find yourself in trouble. After all safety is paramount.


One Comment