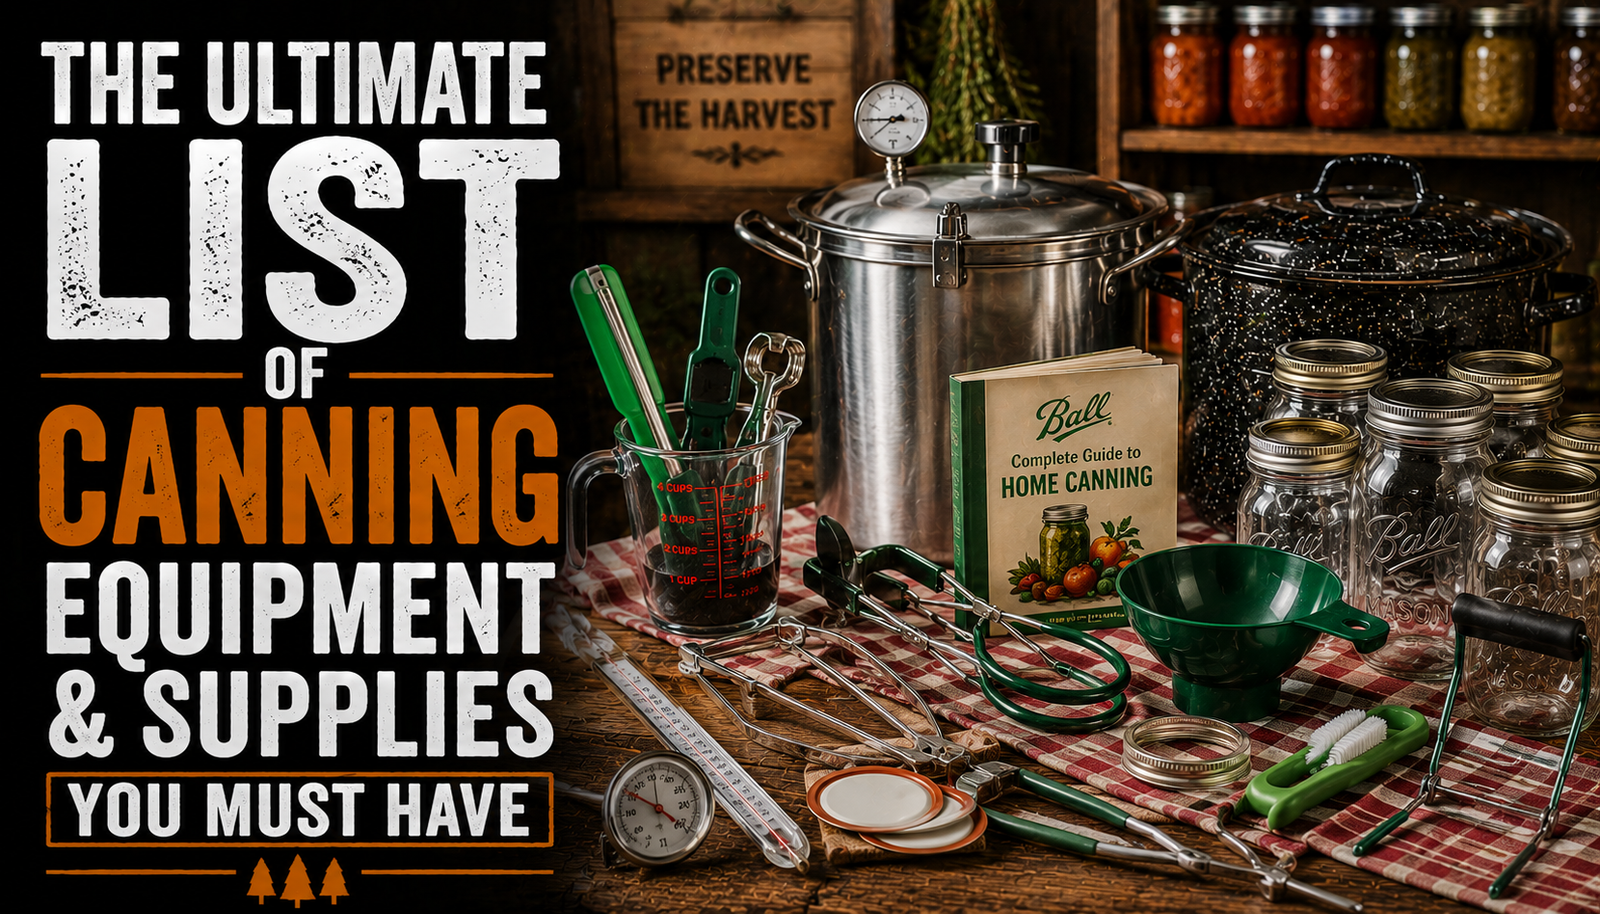
The Ultimate List of Canning Equipment & Supplies You Must Have
Preserving Food through Canning Is Easier Than You Think
When many people think of canning they either get an image of their grandmother canning in years past, or they freak out about all the information saying you’re going to get food poisoning. In the cases of their grandmother canning these images often bring back warm memories of their childhood and fresh preserves and jams.
On the other side of the spectrum though is all of the information online warning how you can get botulism. While this is a real concern, with proper technique and canning equipment this risk can easily be negated.
So grab a pen and paper and let’s dive into those pieces of equipment that will make this journey that much easier and prepare you to enjoy your tasty harvests throughout the year.
The List – Yup This is It
The items that you will need really do not change much between the different types of canning. The main exception being the type of canner you will need. So with that in mind here is our list of the canning equipment. 1 through 4 are the basics that you must have. Items 5 through 10 are those nice to have items that make life so much easier.
- Canner
- Heat Source
- Jars & Lids
- Food To Be Canned
- Canning Funnel
- Ladle
- TongsCanning Jar Lifter
- Canning Jar Lifter
- Magnetic Lid Lifter
- Towels
Tip – Often you can find sets that contain all of the items you need in one kit
The Equipment in Detail
In order to hopefully answer any questions that this list may have given you I am going to break down these items in more detail. Hopefully after this you will have a basic understanding as to why you need each of these items and how they can make the canning process go smoothly.
1.Canner
There are two primary types of recommended canning today. These are pressure canning and hot water canning each of these requires a slightly different canner. While you could use a pressure canner for the water bath canning process the reverse is not true.
A pressure canner uses a locking lid with a special weighted valve to control the build up in pressure needed to properly package your food. These require a special design and it is not recommended that you use a regular pressure cooker or an instapot for this purpose.
Review of the Ball Electric Canner
A waterbath canner on the other hand is far more forgiving. For most purposes you can use any large pot assuming that you can fully submerge your jars. If possible try and avoid aluminum pots if possible.
I suggest that you make sure to get a high quality canner such as this Presto 16 Quart Pressure Canner or this Roots & Branches 20 Quart Waterbath Canner
2. Heat Source
This can be a point of contention for some people and it really depends on what you have available to you and how much you are going to can. In order for either type of canning to work you are going to have to boil a significant amount of liquid for some time.
Most gas ranges are capable of reaching the required temperature with little issue. However, electric stoves and glass top stoves can both struggle to reach the necessary temperatures. If you are using either of these methods, expect longer than listed cook times and make sure to add additional time to your recipes to account for this.
One option you could consider is an inexpensive outdoor propane burner similar to a turkey fryer. These produce very high heat and are great for canning, with the added bonus of the heat is left outside and not in your kitchen.
3. Jars & Lids
Jars come in many shapes and sizes. There are also varying thicknesses in glass and even varying levels of details on the jars. Each of these are worth considering when choosing what jars are best for your needs.
When choosing a size, consider how the contents are going to be used. Are you canning a soup that is likely to be consumed all in one sitting? Are you canning jellies that could take weeks to consume a pint of? What about portion size, single serving or a family serving.
Once you have chosen an appropriate size your next choice is probably the finish of the jar. If you are stocking your own pantry then you may not care about any details on the jar. However, if you are intending to give jellies, peppers and sauces away as a gift then you might want to choose a more attractive jar.
In regards to lids and rings, there are 1 piece lids, 2 piece lids and a few others. Normally stainless steel two piece lids are your best option. Make sure to use new lids each time. They do make some reusable mason jar lids but I have not tried these out as some of the reviews concerned me. (I’ll attempt to do a more indepth review of them for myself later and let you know the results.)
4. Food To Be Canned
While this one might seem obvious, I am sure someone will forget their vegetables. While there are many many foods that you can safely use, some options are better left alone. For instance milk and other high fat products don’t tend to fare well in cans.
However, many meats, all vegetables and fruits as well as some complete meals can be canned safely. You can check the National Center for Home Food Preservation for tips on safely canning food if you have any concerns that are not addressed here on our site.
5. Canning Funnel
The canning funnel is the first of our items that while nice to have you don’t necessarily need. These funnels are designed to fit the mouth of the jar and reduce the chances that you will spill your prepared foods.
They are most useful when hot packing. Since you will often be pouring the contents from a hot pot instead of simply placing them into the jar.
Like most of the other items on this list, you have numerous options. Pickup one that fits the mouth of the jars you will be using and personally I prefer a canning funnel that is made from stainless steel over those made from plastic.
6. Ladle
A ladle is great for both cold packing and hot packing your jars as it allows you to easily fill the jars with hot water. Again for this purpose I recommend a stainless steel ladle over plastic or aluminum.
7. Tongs
Most people think of tongs as the tongs they use on a grill. While these are useful to place foods into your jars I am talking more specifically about canning tongs.
These are larger than normal tongs and are shaped to fit the mouth of your jars. Often they are coated with a rubber grip in order to minimize the chance of damaging the jar mouth.
These tongs allow you to remove single jars from your hot water prep, fill them and then easily transfer them to the lifter to be placed into your canner when ready.
8. Canning Jar Lifter
Some people argue that a canning jar lifter is not needed, or that you can substitute a pair of canning tongs in its place. However, a canning jar lifter has some distinct advantages and you should definitely consider getting one that fits your canner if it did not come with one.
A canning jar lifter allows you to raise or lower an entire rack of jars into the canner at once. This is especially useful once the canning process is completed and you need to remove the jars to allow them to cool down.
Another advantage and one that is often overlooked is that a canning jar lifter goes into the canner with the jars. This creates a space under the jars and allows for a more even distribution of heat. Without this lifter your jars will be sitting on the bottom of the canner and may possibly burner or scorch the food on this side.
9. Magnetic Lid Lifter
While not a must have a magnetic lid lifter will save you some burnt finger tips. When canning you heat the jars and the lids prior to filling them with their contents. Once the jars are filled it is necessary to place a hot lid on the jars.
If not properly prepared this frequently results in burned finger tips, either from retrieving the lids from the hot water or picking them up while they are still hot. This can be avoided by using a magnetic lid lifter.
Since most canning lids are made from stainless steel they can be picked up by a magnet. A magnetic lid lifter takes advantage of this by positioning a small magnet on the end of a rod.
You can reach into your hot water, retrieve a lid with the lifter and then place it directly onto your jar without ever having to touch the lid with your fingers. This is definitely one of those tools that I would add to my canning kit.
10. Towels
While this may seem a bit strange you want to make sure you have some towels available when canning. I don;t mean those thin little hand towels commonly found in kitchens. You want to make sure you have some thick large towels handy. I actually use bath towels I bought just for this purpose.
You may or may not have seen first hand glass shattering when the hot glass touches a cold surface.It is this reason why I suggest having a thick towel on hand. The thick towel will act as an insulator while your filling the jars.
Additionally these towels will provide padding for the jars when they are set down. This minimizes the potential breakages that can occur while the glass is heated.
Finally they provide a great place for your jars to cool down without allowing water to spread along your counter tops when the jars are removed from the canner.
Additional Canning Accessories You May Want To Consider
As with everything there are always those additional items you could purchase that will make things easier. Here are a few more items you might want to consider.
- Food Processor or Food Mill
A food processor or food mill will aid in preparing sauces and jellies. A food mill is the better option as not only can it puree the vegetables and fruits but it can also be used to strain the peels and seeds from the mixture.
- Food Strainer
A strainer is great for washing the garden soil from your vegetables and for filtering out unwanted parts when making jellies and sauces.
- Label Maker
If you are packaging the jars for yourself then you could get away with simply writing the date on the top of the jar, however a label will make sure this remains easy to read and is critical for branding if you intend on gifting or selling any of your jars.
- Cook Books
Canning cookbooks are some of the only cookbooks that I own. This is due to the necessity that times be accurate for food safety.
In normal cooking if I happen to boil the soup for 5 minutes less than recommended it is not likely that the food will go bad. In canning 5 minutes can be the difference in a properly sealed can and one that fails.
Two of my favorite canning books are:

Amazon Link For Convenience

Amazon Link For Convenience
Both of these books are available from Amazon and provide tons of recipes for a variety of foods to stock your pantry with. You can make these recipes with items you grow yourself, purchase from your local farmers market or even purchase from your local grocery store.
- Food Ph Meter
A food Ph Meter may seem strange but is actually quite useful.
In order for foods to be safe for water bath canning they need to have a Ph level lower than 4.6. This indicates they are somewhat acidic in nature and this acidity will prevent bacterial growth. Most often this includes tomatoes and some vegetables.
Anything with a Ph higher than 4.6 must be canned using a pressure canner. This is due to the low acidic level being insufficient to kill any bacteria that may grow inside of the jars.
Hopefully This Canning Equipment List Gets You Started
Hopefully you found the information you were looking for and now understand what items you need to start your canning journey. I attempted to elaborate on what each item does and why it is important to add to your supplies.
While you are here head on over to our canning section. I am working diligently to add more canning related content. This includes equipment reviews as well as recipes. This is in order to better provide you with useful information.
If you have any suggestions on other canning equipment that I should add to this list, or canning questions you would like answered feel free to add them below.


One Comment